Do you remember that show “Where in the World is Carmen SanDiego” … that educational / detective game show on PBS for kids from the 90’s?
When I was trying to think of a good title for this blog entry, the jingle for that show popped in my head, so I couldn’t resist mentioning it.
Anyhoo…..YIKES?! Has it REALLY been since June that I last posted?! Where does the time go?! Well, from now on, until the end of the school year, I’ll be posting regularly (at least once a month).
I’ve got a lot to catch up with! Here’s what all my students have been working on since the start of the school year!
I’ll start with 5th grade artwork and work backwards to 1st grade.
ALSO… There are some NEW art lessons that I’m starting with my students for ALL grades!
Here is a collection of my teacher examples for all the NEW art lessons students will be starting in the next week or two! More details on these lessons under each grade level discussed below.

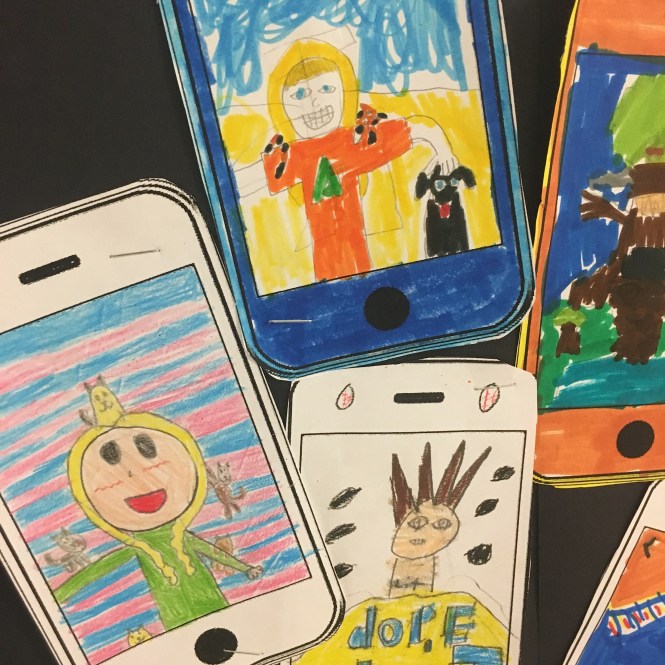
5TH GRADE
SUPERHERO SKETCHBOOK COVERS
This lesson took about (6) 40 minute art classes to finish
In the beginning of every year I have all grades create their own sketchbook that will be used periodically throughout the year in art class.
Each grade level has a different drawing lesson to create the cover for their sketchbooks.
Sketchbooks are used during class to: practice drawing before creating a final version, free draw in if finished with a lesson early, to write down information that they’ve learned from a particular lesson, and to experiment with various art materials.
On the first day of the lesson I showed them my PowerPoint slideshow of various famous comic book covers from the 1950’s onward, as well as previous 5th grade student artwork before drawing. They LOVED it and it got them excited to come up with their own ideas!
Students then filled out a worksheet to plan their drawing (what was their name going to be? Were they human? An animal? A mystical creature? An inanimate object? Food? Where did they fight crime?, What were their superpowers?, Did they have a sidekick? etc.) to help with final decisions. Then on the back of the worksheet students sketched ideas for their superhero and outfit.
On day 2, students drew the title, then started drawing their own unique superheroes (something that hasn’t existed before, creating their own!) demonstrating their superpowers. Students had a packet of various superhero poses and superheroes in action to use a reference when drawing.
They had a choice of creating sidekicks, whether they wanted to include a villain and needed to create a background scene.
Drawings were then outlined in black sharpie and colored in with a choice of marker or colored pencil or both.
I love this drawing lesson because it allows so much creativity! Each one is so unique!


FALLING FOR FORESHORTENING – 5TH GRADE
This art lesson takes about 4 to 5 (40 minute) art classes
For this art lesson, students learn about a type of perspective called foreshortening, and continue to expand their knowledge on ways to create something that appears to have depth and a sense of space on a flat piece of paper.
Foreshortening is a drawing technique used to create the illusion where parts of something or someone appear to come out at the viewer strongly, making those areas seem closest to the viewer, and some parts appearing to recede strongly, making those areas seem the furthest away from the viewer.
Students used this technique by drawing a person that appears to be falling backwards into something, with their arms and legs outstretched, by tracing their hands along the top of the paper, and their feet along the bottom of the paper, leaving space in the middle. They then drew the head, neck, arms, and legs of a person smaller, to create the illusion that the body was further away than the feet and hands.
Students were instructed to pay special attention to the soles of their shoes, and hands, being sure to add details and texture.
Students also had to draw the person’s facial expression to match whatever it was they were falling into (something scary, or something soft and fun), and to show movement in the hair.
Once the person was drawn, they outlined in black sharpie, then drew a background depicting what their person was falling into, and colored in everything using colored pencils.
Students are currently working on this lesson and haven’t finished yet. Here are a few drawings in the works!


The ones below are finished drawings by my previous 5th graders just to show some final versions!


I’ll be posting CURRENT 5th grade students finished Falling For Foreshortening artwork soon!
Students and Parents- My Monday 5th grade class (5Y) have only had 7 art classes so far since September due to holiday’s and ½ day PD days so they are a bit behind. Because of this, I’ve decided to have them start HOLIDAY LIGHTS first, since it’s a short 2 day lesson and THEN move on to the “falling for foreshortening” lesson.
HOLIDAY LIGHTS! – 5TH GRADE
This art lesson takes just 2 (40 minute) art classes to finish!
We use oil pastels, chalk pastels, glue sticks, scissors and Sax black Art paper for this lesson. Students review VALUE and learn how adding white to colors create TINTS.
I got this wonderful lesson idea by the AMAZING art teacher artwithmrsnguyen
Go check out her awesome website if you haven’t already!
Students will be working on this lesson soon– if they haven’t already! So, no photos to share of this year’s 5th graders final creations yet! But, I will be sure to post their finished artwork as well as photos of students creating them shortly!
Just so you can see what they look like–These are some photos of my 5th grade student’s “Holiday Lights” drawings from previous years!


Jim Dine Inspired PAINTBRUSHES – 5TH GRADE
I got this amazing art lesson idea from art teacher, Lauralee Chambers (her Insta account is @2art.chambers )
My Teacher example below- I had so much fun creating this and I know my 5th graders will too!

I am SOOO EXCITED about this lesson guys! I cannot wait!!
5th graders will start this one after “Falling for Foreshortening” and “Holiday Lights”!
We will use sharpies, black oil pastel, and watercolors to create them.
More details coming soon….
4th GRADE
SKETCHBOOK COVER DRAWINGS
So, for this particular sketchbook cover drawing lesson, fourth graders created a personalized drawing using their initials.
First, students created a tracer (template) of their initials by drawing them in block letter style on a small piece of manila tagboard and then carefully cut them out as one piece. I explained to students that the letters had to touch somewhere, but not overlap in order for this to work. Students could draw their letters backwards, stack them on top of each other or have them side-by-side. To cut out smaller areas (like the triangles in the letter “A”, or openings in the letter “O”) they used a hole puncher or scissors to open it up before cutting.
Once cut out as one piece, students were then challenged to create an interesting design by tracing their initials template at least 8 times without overlapping on a piece of 8×11 80# paper. Students had the choice of drawing some initials coming off the page, and could trace them turned in any direction they wanted.
Once outlined with black sharpie, students then created an interesting background design using lines and/or shapes with pencil then colored in with an analogous color palette using colored pencils. The letters were left white to pop and stand out against the background. Students overlapped colors together where needed to achieve the necessary analogous color. Pieces of scrap paper were used to test out color combinations before coloring on their final drawing.


VICTORIAN ARCHITECTURE – 4th GRADE
This lesson takes (6) 40 minute art classes to complete. I think absolutely worth every class though! Students are taking their time carefully crafting their unique houses!
4th Graders learned what architecture is, learned about some of the common characteristics found within the Victorian architectural style (Gables, bay windows, fish-scale shingles, turrets, towers, front porches, gingerbread details, multiple chimneys to name a few), and then created a drawing of their own Victorian style house that included some of those elements!
On the first day, I showed students a PowerPoint of various Victorian homes, which pointed out these particular elements. I also showed students a variety of Victorian house drawings students created from previous years, as well as my own examples. We talked about how many of us noticed Victorian houses in the area as well, and how some students live in one or have relatives that do.
We also reviewed the Elements of Art and how students would be utilizing 6 out of the 7 elements of art to draw their homes; Line, Shape, Color, Space, Texture, and Value.
After I did a demonstration on how to draw some of the Victorian elements, students practiced drawing them on a worksheet.


Each student received a “step-by-step” how to draw Victorian elements packet that I created if they needed, as well as handouts of various Victorian style homes to use as reference while drawing.
I explained to not “copy” but to look at the various images for inspiration to create their own unique Victorian house.
Students certainly did! Check out the beautiful drawings in progress below!


I asked students if they had any architects in their family, or if they knew of anyone who was one. Many students did and it was great to hear so many fun stories about the connections they already have with architecture!
Once students finished drawing their houses, they carefully colored them in using colored pencils with any colors they wanted.
I demonstrated how to color in the chimney’s bricks (or other brick details within the house) using a variety of reds, browns, white, tans, and pinks and suggested to stagger the same color just like in real chimneys. And to color any stones with browns, black, greys, tans and white.
Most students are still creating their houses, but here are some finished ones as well as ones in process!!
Students are doing a fabulous job! I LOVE how unique each one is!


I’LL BE SURE TO POST MORE FINISHED VICTORIAN HOUSES ONCE ADDITIONAL CLASSES COMPLETE VERY SOON!
CLICK Here to a link to download my FREE PRINTABLE step-by-step Victorian detail drawing handouts on my Teachers Pay Teachers page as well as my own Victorian Architecture PowerPoint (which can also be printed out for students to use for reference in your classroom).
POSITIVE / NEGATIVE TREES– 4th GRADE
This is one of the new art lessons that 4th graders will start very soon!
It’s a 1 day (40 minute) art lesson and uses construction paper, scissors and glue sticks to create.
This lesson is from LauraLee Chambers (@2art.chambers )
4th Graders will review complementary colors, positive/negative space, and symmetry while creating a cut out tree design on 1 sheet of 9×12” and 1 sheet of 9×6” colored construction paper.
BELOW ARE SOME OF MY TEACHER EXAMPLES TO SHOW STUDENTS


I’M LOOKING FORWARD TO SEEING WHAT MY 4TH GRADERS CREATE! I KNOW THEY ARE GOING TO LOOK AMAZING!
3RD GRADE
SKETCHBOOK COVERS
3rd graders were allowed to draw whatever they wanted for the cover of their sketchbooks this year. I encouraged students to draw large and clear, and to use bright bold colors when coloring in. Students could use markers or colored pencils to color with after outlining their drawing in sharpie.
They were very creative with their drawings!


DAY OF THE DEAD SKULLS– 3RD GRADE
This lesson took about 4 (40 minute) art classes to finish.
On day 1 -3rd graders learned about the Mexican holiday Dia de los Muertos (Day of the dead) and looked at a slideshow of images of the celebrations and festivals with people in costume celebrating the holiday as well as students skull artwork from previous years.
Students chose a black and white skull image that had been lightened in the photocopier. They taped their selected skull image to a 9×12″ sheet of tagboard that was wrapped in tinfoil (taped at the top only) with masking tape. Then students traced over all the lines of the skull image with a dull pencil to transfer the image onto the tinfoil.
Students could alter their image by drawing additional designs while tracing.
The traced print out image is then removed, revealing their transferred image on the foil.
On days 2-4, they colored in the designs of their skull on the tinfoil with colored sharpies.
Although a very simple art project, students love it. It also introduces them to various transferring methods which they will further explore this year when they start printmaking with Styrofoam.


SELF-PORTRAITS WITH PERSONAL SYMBOLS -3rd GRADE
This lesson takes about 4 (40 minute) art classes to complete.
This lesson was inspired by the artist Frida Kahlo, who is well known for her self-portrait paintings and often incorporating symbols into her artwork.
DAY 1:
Students were introduced to Mexican artist Frida Kahlo, and learned about her interesting life and beautiful artwork!
We looked at a variety of her self-portrait paintings and some photos as well showing her with her many unique pets! (Students loved seeing her with her pet spider monkey, 4 parrots, a deer, a hawk and other interesting creatures! She loved animals and had a lot of unique pets throughout her life!
Students also learned how she originally wanted to be a doctor and studied medicine, but then was in a terrible trolley accident which left her bedridden in the hospital for a very long time. Her mother gave her paints and drawing supplies to help her pass the time in the hospital and set up a mirror above her bed, which led her to her love of painting, becoming an artist and creating her many self-portraits!
After discussing her use of symbolism in some of her self-portraits, and discussing what a symbol was, students looked at a variety of student examples as well as my teacher examples.
For the lesson, I explained they needed to draw themselves large on the paper vertically, only including their head, neck and shoulders, (like in their school photos!) then to draw 6 – 7 symbols around them that reflect their interests and personality. The symbols should be drawn large and at least as big as their closed fist (making sure the objects are clearly identifiable and easy to outline and color in later on).
Then, I reviewed with students how to draw the shape of the head and facial details as well as facial detail placement on the head, under the doc camera on 12 x18″ 80# paper. I had facial detail handouts to use and refer to as they drew with a variety of eyes, noses, and mouth images if they wanted to use them, but didn’t have to.
Students then started drawing soon after with pencil, drawing lightly in case they needed to erase.
DAYS 2-4:
Students continued drawing and once all details were added and 6-7 symbols were drawn around them, they outlined all lines with a black sharpie.
Students used crayons (pressing firmly, so the colors would be vibrant) to color in. I explained to find a crayon or two, (overlapping and blending the two colors if needed) that best matched their unique skin color, hair color and eye color.
As a final step, students chose one color to color in the background, to make their self-portrait and symbols stand out, filling in the entire paper so no white paper was showing.
Students are currently still working on these. Here are some photos of them creating their self-portraits! I will post finished artwork once complete soon!


Thank you Kaitlyn (Art with Mrs E) for this helpful facial expressions sheet! My students loved it! You can get a copy in her TpT account. Her insta account is (@artwithmrs.e)


POLAR BEARS – 3RD GRADE
This is another NEW art lesson that 3rd graders will begin very soon!
These adorable polar bears will take about 2 (40 minute) art classes to complete.
This lesson idea came from art teacher Lauralee Chambers (insta account is @2art.chambers)
We will create them using liquid watercolors, salt, and black oil pastel on 80# 12×18” paper. More details to come!….
Here is a photo of my teacher example

2ND GRADE
WARM/COOL HAND WITH PATTERNS SKETCHBOOK COVERS
This lesson takes about 3-4 (40 minute) art classes.
So for this particular sketchbook cover drawing lesson, second grade students created a hand drawing using warm and cool colors with patterns.
Students first traced their hand and drew a pattern inside their hand. Then they drew a different pattern in the background filling in the entire page.
After outlining with a black sharpie, they colored inside their hand using only warm colors, and colored in their background using only cool colors with markers.


MONSTERS – 2ND GRADE
Second graders had a blast creating these super adorable silly monsters!
On day one (of two) for this lesson, students drew a simple monster head shape with two pointy parts for ears, on their chosen 9×12″ colored construction paper background with pencil. They then dipped the edge of a 2″x4″ piece of thin cardboard into black paint and “stamped” short black lines along the edge and within their monster to create texture for fur. These were left to dry until the next class.


On the second day of the lesson, students then cut out their monsters, leaving a little color around the edge and glued onto a 12×12″ piece of black construction paper.
They added big eyes with punched out white paper circles and smaller punch-outs from black paper for the pupils, then cut their own mouth and fangs!


I LOVE all the different expressions! Thank you @mrsallainart (via Instagram) for the inspiration!


POSITIVE/ NEGATIVE HANDS -2ND GRADE
For this lesson, students learned about positive and negative space in artwork and used their previous knowledge (from their sketchbook cover lesson) on warm and cool colors to create this colorful vibrant painting.
First, students painted a 9×12″ paper using either only warm colors, only cool colors, using liquid watercolors.
On the second day of the lesson, they traced their hand on the back of their painting using pencil, then using scissors, cut a line going up to their palm and carefully cut out their hand as one piece and set it aside.
They took the remaining paper with the hand cut out, and glued down to the left side of a sheet of 12×18″ black construction paper, being sure to line up the edges.
Students then folded the positive cut out of their hand in half and drew a half circle (or any other half shape) in the middle, cut out and glued to the center.
The remaining hand with the shape cut from its center was then glued to the right side of the black paper.
This fun lesson idea is from Mr. O http://mrosartroom.blogspot.com/


BEARS IN SWEATERS – 2ND GRADE
This lesson will take about 3 to 4 (40 minute) art classes to complete.
This is also a NEW art lesson this year! This lesson was inspired by art teachers Art Room Britt and Lauralee Chambers (insta account is @2art.chambers)
2nd graders have already started these adorable bears with loads and loads of texture for fur and can’t wait to share their finished results!! They are doing an amazing job creating them so far!
We will incorporate some math in the mix when creating our patterned sweaters using dice as well!
Here are my teacher examples below


Here are some photos of my 2nd grade students creating their bears!


I’ll post finished bears with further details on how we created them once students complete them very soon!
1ST GRADE
LINES THAT WIGGLE SKETCHBOOK COVERS
So for this particular sketchbook cover drawing lesson, first graders drew overlapping, loopy lines to create an abstract drawing.
Students drew 8 loopy lines from one side of their paper to another in pencil. I encouraged them to draw large loops so it wouldn’t be too time consuming when it was time to color. Lines could overlap one another and I pointed out while demonstrating, that when a line connects it creates a shape! Plenty of shapes were created once the 8 loopy, overlapping lines were drawn. Students then went over all their lines with a thick black sharpie, then colored in each shape carefully with different colored markers. I demonstrated how to use larger markers for larger areas to fill in and thin tipped markers for smaller areas. Students were encouraged to fill in all the white spaces on their paper. 1st graders learned that artist’s use sketchbooks to plan out ideas for paintings or other artwork, to jot down ideas and other information, to experiment before making final decisions and to practice their drawing.


When students finished their covers, they practiced drawing other types of lines that we talked about inside their sketchbook

PUMPKINS STARRY NIGHT – 1ST GRADE
This lesson takes 3 (40 minute) art classes to finish
On day 1 of the lesson, students looked at a slideshow of Vincent Van Gogh’s paintings and learned about his life and artwork. We took a close look at his painting “The Starry Night” and noticed that he used lots and lots of short lines painted close together in certain directions, to create a sense of movement!
Then students got to work creating their own Van Gogh inspired masterpieces with a pumpkin!
Students followed along with me for the first steps, as I demonstrated under a document camera.
They traced a pumpkin using a cardboard cut-out along the bottom of their 12×18” paper. Students held their paper vertically rather than horizontally, so they would have more room on their paper to create the starry sky.
Students then drew a line for the ground, a crescent or full moon and small circles for stars with pencil. They then drew lines in the pumpkins stem, and curved lines inside the pumpkin. Students could then add a face for their pumpkin if they wanted to.
Students then took both a yellow and a green crayon in one hand and drew lines using both colors at the same time, all along the bottom for the grass texture making sure to press really hard as they drew.
They colored in the moon and stars with yellow, and outlined all the lines within their pumpkin and stem with whatever colors they wanted, making sure to continue pressing hard.
For a final step with the crayons, just like Van Gogh did with his brush, students drew lots of short dashed lines with yellow, circling all around each star. Then with blue crayon drew more dashed lines all throughout the sky curving around their stars to create a sense of movement!
On day 2, students continued adding dashed yellow lines around the stars and dashed blue lines in the sky with crayons.


On day 3, students learned the crayon wax resist painting technique! They painted their pumpkin, grass and sky any color they wanted but each a different color, using liquid watercolor paint and learned how the waxy crayon resists the watercolors. 1st graders also learned how to properly clean their brush before selecting a different color and to not mix colors within the paint trays.


NOT SO SCARY SCARECROW COLLAGE – 1ST GRADE
This lesson takes about 3 (40 minute) art classes
For this lesson, students learned what a landscape is, and looked at various landscape paintings by the artists Vincent Van Gogh, David Hockney, and Grant Wood.
They then created their own landscapes by drawing rolling hills with different types of lines within each hill, a few clouds and a sun either setting, or up in the sky, with crayons.


On day two, they painted over their hills and sky, creating a crayon wax-resist technique using watercolors.


On day three, students created a scarecrow using little cardboard shirts, pants, and skirt tracers (that I made previously) onto different cut patterned papers, raffia for arms, buttons and glued them onto their landscapes.
For a final touch, students added additional details with sharpies and crayons, like hats, hair, facial details, and crows.


WINTER LANDSCAPES – 1ST GRADE
This is a NEW art lesson for my 1st graders this year! I’m in love with the colorful trees and think my students will love them too.
We will begin this lesson after finishing up the “Not So Scary Scarecrows” very soon!
We will use colorful tissue paper cut into small sections, watered down white school glue, 12×18” 80# white drawing paper, rulers to draw the triangles for trees, black colored pencils, black construction paper, and toothbrushes dipped into watered down white tempera paint for creating snowflakes!
Here is my teacher example below

I’ll post more details with student artwork once they finish the Winter Landscape lesson very soon!
SPECIAL EDUCATION
THE DOT
Students watched an animated video of the book “The Dot” by Peter Reynolds. After the video they dipped their finger into various colored tempera paints on plates and printed their finger either all around a pre-drawn circle or within it. We created these on 12×12” 80# paper.


MARKER PRINTS – SPECIAL ED
Students each received a small piece of Styrofoam printing sheet and drew straight overlapping lines using a colored pencil. Then colored in each shape with different colored markers.
On a separate 9×12” 80# piece of paper, I sprayed water and wiped gently with a damp sponge. The colored Styrofoam was placed (colored side down) onto the wet paper and students pressed with their hands to transfer the image. Students loved seeing this cool process!


TISSUE PAPER PUMPKINS – SPECIAL ED
Students created these gorgeous pumpkin collages using liquid watercolor, tissue paper, watered-down white school glue, pre-cut leaves from sponges and liquid tempera paint!
On day 1 of the lesson, students traced a pumpkin using a cardboard tracer onto 9×12″ paper. They then glued on orange, red, yellow and pink squares of pre-cut tissue paper using a paintbrush and watered down glue. They brushed on a second layer of glue once a piece of tissue was placed on. They used a brown piece for the pumpkin’s stem.
On a second sheet of 12×18″ paper, students painted a turquoise sky with liquid watercolor paint. (Very vibrant!)
On day 2 of the lesson, students cut out their pumpkins and glued onto the sky painting. They then glued on cut strips of various green and yellow tissue paper for the grass using watered down school glue and a paintbrush.
For the final step, they sponged on leaves in the sky by lightly dipping a pre-cut sponge in the shape of a leaf into a plate of drizzled red, yellow and orange liquid tempera paint, then gently pressed onto the sky to create falling leaves!
One of my favorite fall lessons!


THE HUNGRY, HUNGRY CATERPILLAR – SPECIAL ED
Day 1- Students first watched a very sweet animated video of this story on YouTube https://www.youtube.com/watch?v=75NQK-Sm1YY
Students then used a small balloon to dip into paint to create the caterpillars body on a sheet of 12×18” 80# paper.
We left that to dry and worked on creating the apple. Students each received a 9×12” 80# sheet with a pre-drawn apple. They glued on layers of red and pink tissue paper with watered down white school glue within the apple shape, then a small rectangle of brown tissue for the apple’s stem. We left these to dry as well until the following week.
Day 2- Students cut out the caterpillar’s body and glued down with a glue stick onto a piece of 12×18” blue construction paper. Then, they glued on green and yellow strips of tissue paper all along the bottom overlapping the caterpillar a bit for the grass using a glue stick.
Lastly, students added cut white circles for the eyes and added legs and antennae with black sharpie.


BATS – SPECIAL ED
For these fun fingerprint bats, I taped down 3 bat shapes with a few loops of scotch tape on the back onto a sheet of 12×18″ black construction paper.
Students printed their fingerprints that were dipped into yellow, orange and white paint all around the bats edges. Once dry, the white paper bats that were taped down were taken off, revealing the 3 bat silhouettes.


SNOWY OWL COLLAGE – SPECIAL ED
This lesson took 2 (40 minute) art classes to finish
Students were each given a piece of 12×18″ black construction paper, that had a pre-drawn white outline image of a snowy owl landing on a branch.
Students added the bark by tearing small pieces of brown construction paper then glued each piece filling the entire tree branch. They then tore white paper into small sections for the feathers in the body of the owl. Then added cut yellow circles for the eyes and a black cut triangle for the beak.
As a final step, students added details with crayons to the tree branches and sky.
I love the texture the torn white paper gives the owls!


CHECK BACK SOON FOR NEW POSTS ON ALL THE NEW ART LESSONS UNDERWAY!
THANKS FOR STOPPING BY!